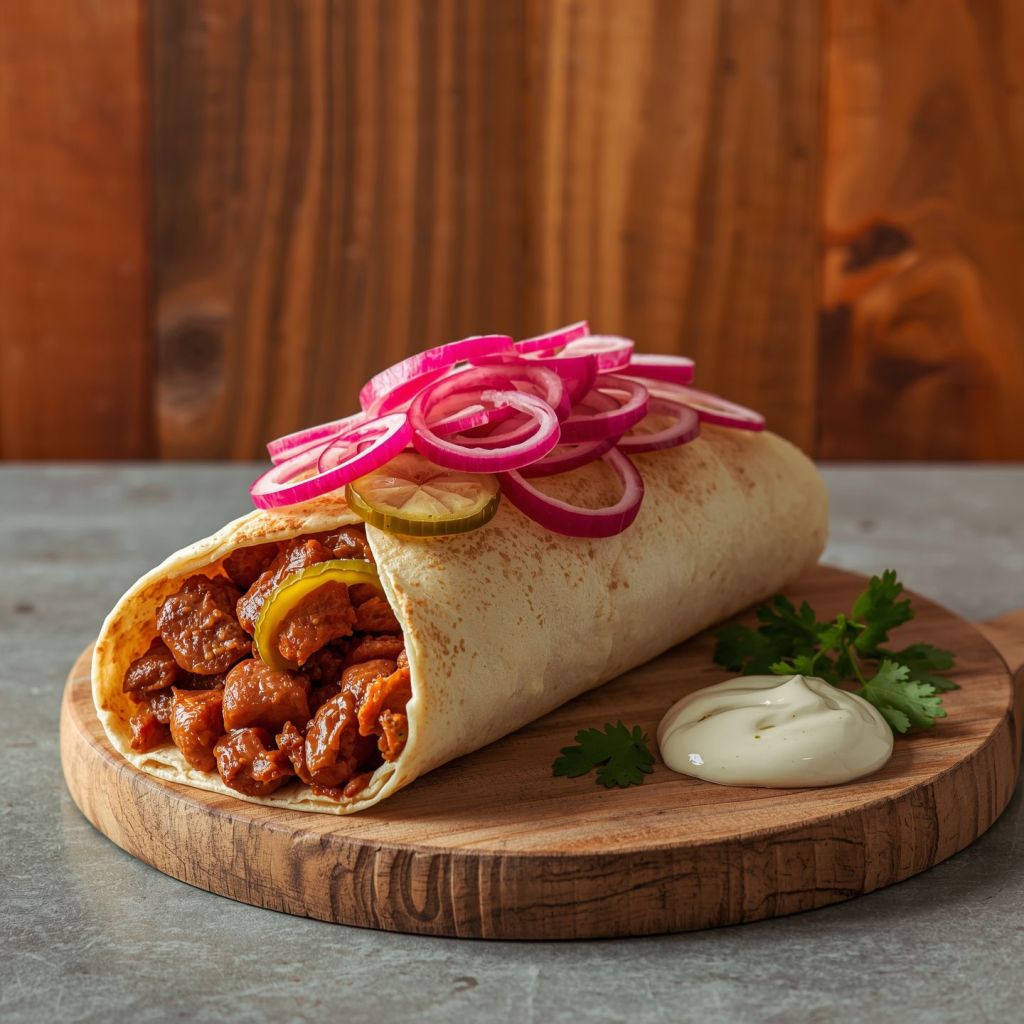
Today, we landed in the Levant and Eastern Mediterranean, home of one of the most recognized pickles. If you’ve ever unwrapped a shawarma or falafel sandwich and found neon‑pink, crunchy sticks tucked alongside the fillings, you’ve met this pickle.
It’s:
– Salty and tangy, but not harsh.
– Earthy from the turnip, with a hint of sweetness from beet.
– Crisp enough to stand up to juicy meat, creamy tahini, and soft bread.
The magic is in the contrast: rich grilled meat or fried falafel, cool crunchy vegetables, and these bright, sharp, pink batons cutting right through the heaviness. And the secret to that color? Just a small piece of beet—no food coloring required.
A Little Background: Pink Pickles of the Levant
These pickled turnips are especially associated with the Levant—Lebanon, Palestine, Syria, Jordan—though you’ll see variations all around the Middle East and Mediterranean. They’re a staple in:
– Shawarma and falafel shops.
– Family kitchens, where a jar lives in the fridge next to olives and labneh.
– Mezze spreads, tucked among hummus, baba ghanoush, and fresh herbs.
The ingredient list is simple: turnips, beet, salt, vinegar, and sometimes garlic and chili. But within that simplicity, they do a lot of work:
– Brighten fatty grilled meats.
– Add color and crunch to otherwise soft dishes.
– Provide a hit of acid in cuisines that lean heavily on olive oil, tahini, and slow‑cooked foods.
They’re also a good example of how pickles can become visual icons. You don’t even need to taste them to know where you are: that shade of pink is pure shawarma‑shop energy.
Choosing and Prepping Turnips
Turnips don’t get as much love as cucumbers, but they’re perfect pickle material:
– Firm and crisp.
– Mildly peppery and earthy.
– Able to soak up flavor while keeping their structure.
For this recipe, look for small to medium turnips that feel heavy for their size, with smooth skin and no major blemishes. Younger turnips will be milder; older ones can be sharper and more fibrous, so peeling is usually a good idea.
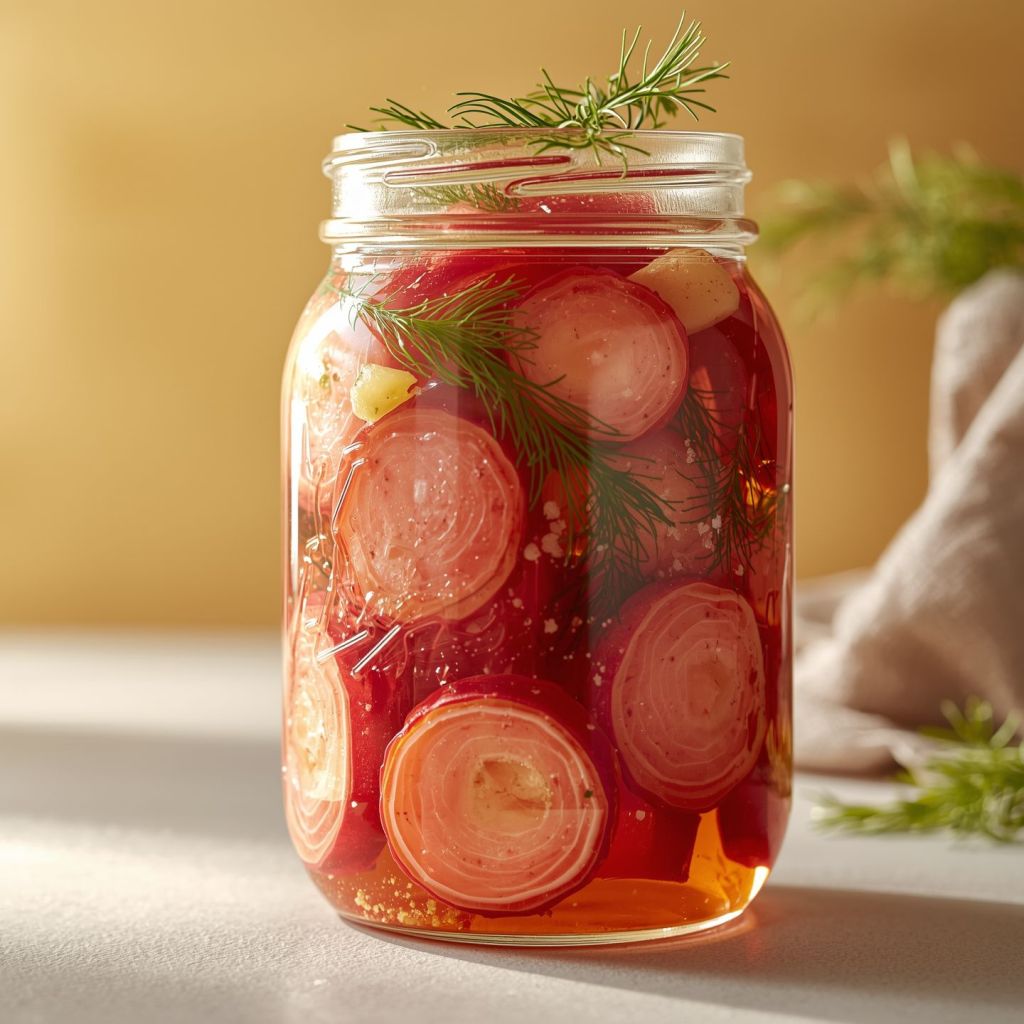
You’ll also need one small beet. You’re not eating the beet for its own sake here; it’s mostly a natural dye and a subtle flavor accent. A few batons of beet in the jar are enough to turn everything an electric pink over a few days.
Pickled Turnips with Beet
Levant‑Style Pink Turnip Pickles
**Yield:** About 1 quart jar
**Time:** 20 minutes active, 3–5 days curing in the fridge
Ingredients
Vegetables
– 1 pound small to medium turnips (about 4–6), peeled
– 1 small beet (you’ll use about ¼–½ of it), peeled
– 2–3 cloves garlic, peeled and thinly sliced (optional but highly recommended)
Brine
– 1 ½ cups water
– 1 ½ cups white vinegar
– 2 tablespoons kosher salt (up to 3 tablespoons if you like a saltier pickle)
– 1 teaspoon sugar (optional, to soften the edges of the vinegar)
Optional extras
– ½–1 teaspoon whole black peppercorns
– ½ teaspoon red pepper flakes or a few slices of fresh chili for gentle heat
Step‑by‑Step Directions
Step 1: Prep the Turnips and Beet
1. Wash and peel
– Scrub the turnips well under cold water and peel off the outer skin.
– Peel the beet as well.
2. Cut into batons
– Slice the turnips into batons about ½ inch thick and 2–3 inches long, roughly French‑fry size.
– Cut a piece of beet into similar batons. You only need enough to tint the brine: about ¼–½ of the small beet. Any extra beet can be roasted or used elsewhere.
3. Prep the garlic
– Thinly slice or lightly smash the garlic cloves so they can perfume the brine.
Set the vegetables aside while you make the brine.
Step 2: Make the Brine
1. Combine everything in a pot
– In a small saucepan, add the water, vinegar, kosher salt, and sugar (if using).
2. Heat gently
– Warm the mixture over medium heat, stirring until the salt and sugar dissolve.
– You don’t need to bring it to a full boil; once it’s steaming and everything is dissolved, turn off the heat.
3. Let it cool slightly
– Allow the brine to cool for 10–15 minutes so it’s hot but not boiling when it hits the vegetables. This helps maintain their crunch.
Taste the brine. It should be punchy—salty and vinegary—but still pleasant. If you want it sharper, add a splash more vinegar; if you prefer a touch more roundness, add a pinch more sugar.
Step 3: Pack the Jar
1. Add aromatics to the jar
– Place the garlic slices, a few beet batons, and any optional peppercorns or chili flakes at the bottom of a clean 1‑quart glass jar.
2. Layer in the turnips and beet
– Pack the turnip batons into the jar vertically or horizontally, whatever fits best.
– Tuck more beet pieces and garlic slices between layers so the color and flavor are distributed throughout.
3. Pour in the brine
– Carefully pour the warm brine over the vegetables, filling the jar until everything is completely submerged.
– If you run a little short, top up with equal parts vinegar and water.
4. Release air bubbles
– Gently tap the jar on the counter and slide a clean utensil down the sides to release any trapped air.
– Make sure all turnips and beet pieces stay below the liquid line—this keeps them safe and evenly colored.
5. Cool, then cover
– Let the jar sit at room temperature until it cools to room temp.
– Once cool, seal with a lid and move it to the refrigerator.
Step 4: Let the Magic Happen
Now you wait—and watch the color transformation:
– Day 1–2: The edges of the turnips will start to blush pink, but the color may still be uneven. The flavor will be lightly salty and tangy.
– Day 3–4: Most pieces will be fully tinted in a vivid pink, and the flavor will be brighter and more integrated.
– Day 5+: The color is set, the turnips are well-seasoned, and the texture is still nice and crisp if you start with fresh, firm vegetables.
You can start eating them as soon as they taste good to you, but most people find day 3–5 to be the sweet spot. Stored in the fridge and handled with clean utensils, they’ll keep for several weeks.
How to Serve Pickled Turnips
These pink pickles are incredibly versatile. Use them wherever you want contrast—color, crunch, and acid:
– Tucked into shawarmaor falafel wraps, alongside lettuce, tomato, and tahini.
– On a mezze platter, next to hummus, baba ghanoush, olives, labneh, and warm flatbread.
– As a side to grilled meats (kebabs, kofta, chicken thighs) or roasted vegetables.
– Chopped into grain bowls or salads for a pop of color and brightness.
– Straight from the jar, as a quick, bracing snack.
They’re especially good with anything rich or creamy: tahini, yogurt sauces, lamb, or fried foods. One bite of turnip resets your palate and gets you ready for the next bite of something heavy.
The Unofficial Shawarma Sidekick
In much of the Levant, pickled turnips are almost inseparable from shawarma and falafel. When you order a wrap, you’re not just getting protein and bread. You’re getting:
– Creaminess (tahini or garlic sauce).
– Freshness (tomato, cucumber, herbs).
– Heat (chili or hot sauce).
– Acidic crunch (these pickled turnips).
If you take the pickles away, the whole balance shifts. They might not be the main event, but they’re essential to how the meal feels.
Simple Techniques, Strong Identity
It’s striking how many iconic pickles in world cuisines are, on paper, very simple: a short ingredient list, basic methods. Yet they become unmistakably linked to a particular place and food culture.
Here, the hallmarks are:
– Turnip instead of cucumber.
– Natural beet dye, not artificial coloring.
– Clean, direct seasoning—no complex spice blend needed.
They’re a great example of how a few thoughtful choices can create a signature regional taste.